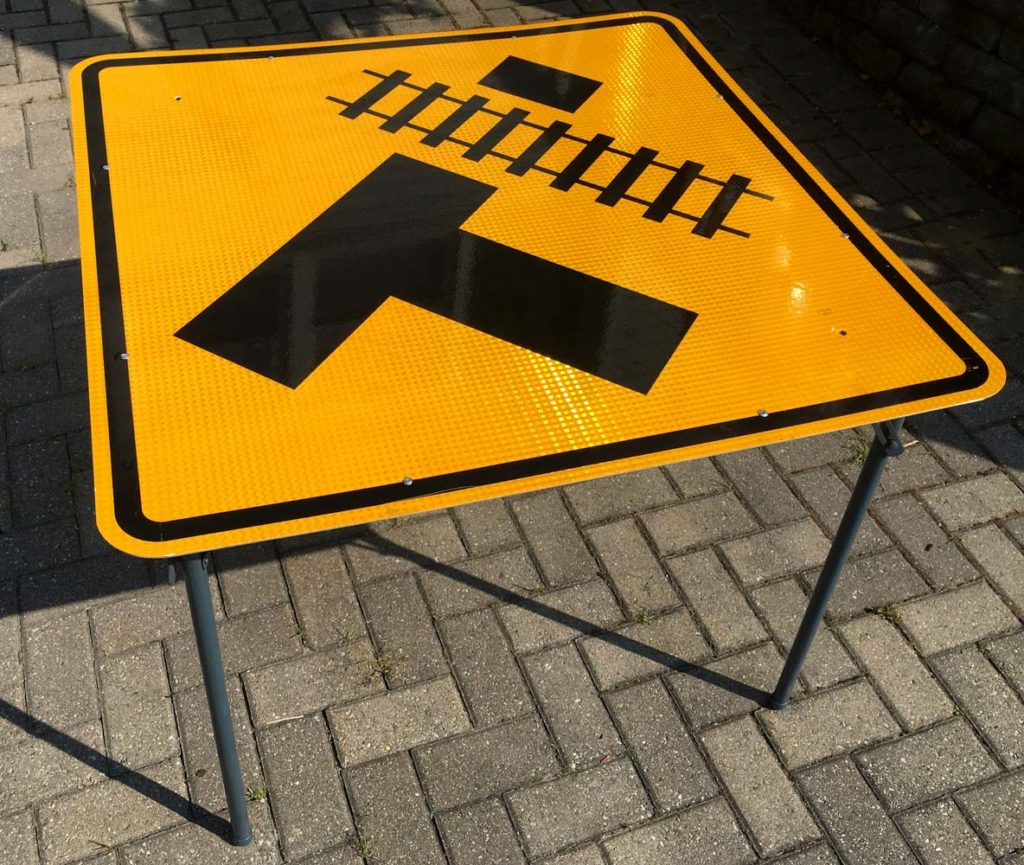
My Foray into Furniture
Up-cycling and recycling items into usable items, like furniture, tables, and lighting fixtures, has been a fascination on mine for some time. Take the show Flea Market Flip. Two teams are poised against each other to find objects and do something with them to later be sold to see who can net the most money at the end of the day. I find most of them really intriguing, but the one that struck me the most was the couple who turned a traffic signal into a very attractive and vibrant bench. A friend must have seen that and bought a signal off of me to do the same thing. Come to think of it, he still owes me $20 for it.
Hmmm... Traffic Sign Tables?
Back around mid 2019, I had a brainiac idea to take a standard road sign and turn it into a table. I'm not sure where the idea came from, but I thought it might be something I would like to have, let alone someone else. How would I assemble it though? How do I add legs to a sign?
While perusing the local Craigslist and Facebook Marketplace listings, I noticed a few of those folding card tables. Their outer dimensions were a bit smaller than the 36-inch road signs I was contemplating using, so that really might work. Even better, there was a kids version of those folding card tables that would fit signs like 36-inch railroad crossing and stop signs. I might be on to something here. These tables popped up every once in a while and I was fortunate to find two kiddie tables. I was eager to get going. But once I remove the usually destroyed tabletop, how do I attach the signs to the table frame?
My initial thought was to somehow weld or epoxy the sign to the frame. My first trip to Home Depot was more or less wasted. I came home with a tube of JB Weld, but I wasn't confident that it would stand up to the rigors of a portable table with pre-painted legs. The same would hold true for the regular epoxy. I needed something more permanent. More solid. Something that I knew would have a really good hold.
I didn't want a bolt going through the sign. That would take away from the overall look of the sign, especially because I would have to add at least four bolts to hold the sign to the frame. After thinking about it, I thought that rivets would be secure enough, yet dainty enough that they wouldn't detract much from the overall coolness of the sign. After some experimenting, I settled on a specific diameter and length that would hold the sign to the frame quite nicely. It looked great!
After showing my prototype to a few people, someone suggested that the outer edge of the sign be finished off somehow. The sign's edge wasn't sharp, but it wasn't kind to your skin if you brushed by it. I thought it was a great idea and started looking for something that would compliment the overall look.
I found an edge trim that is designed to go around metal plating and unfinished or rough edges of fiberglass. You'd usually find that on trucks or boats. It's a rubberized PVC material with metal clips on the inside to assert a tight grip on whatever you're putting it on. It worked well and looked great. But it's difficult to get on and my fingers are sore after pressing it onto the sign. I tried using a rubber mallet, but that just bends and distorts the shape of the trim. No shortcuts there.
Sold!
With the final piece added to the table, it was ready for the world. After a couple of months on ebay and Etsy, a woman from New Jersey purchased it for her train-loving son. To avoid shipping charges, her father stopped by to pick it up. I was beyond thrilled to later see the positive feedback posted on my ebay account: "Absolutely LOVE this unique upcycled railroad sign table! Worth every penny!"
I've assembled a couple of more tables and have a few more signs and tables that need to be put together. It's enjoyable assembling these things. And if I can continue to get that kind of feedback, I'll keep making them.


